Paid and unpaid product customisations and add-ons
Overview
The add-ons feature in Centra allows customers to purchase products with customisations or additional physical goods and services. This includes:
- Customisations allowing brands to collect payment for services like embroidery, tailoring, or adding patches to a garment.
- Physical add-ons allowing brands to offering extra items during the purchasing journey, such as additional shoelaces or premium gift wrapping for an extra fee.
The add-ons feature is comprised of three key capabilities:
- Add-on products:
Customisations are created as separate products in the Centra admin. You can use variants to offer tiered pricing (e.g., "Standard" vs. "Premium" gift wrap). - Link between add-on and main product via Integration API.
The relationship between a main product and its add-on is managed exclusively via the Integration API. These links are functional for logic and reporting but are not displayed in the standard AMS main product view. - Order line custom attributes:
These allow you to attach structured metadata to any order line. This is essential for personalization cases such as storing specific engraving text or gift messages; or operational instructions such as tagging lines with fulfillment routing data, such as "monogramming station" instructions.
How to set up paid product add-ons
By creating "Service Product" or "Add-on Product" in Centra, you can represent customisations that carry their own price.
How it works
Create a separate product (e.g., “Engraving Service” or “Gift wrapping”) and use line attributes to store the specific value (e.g., engraving text or wrapping type). You can also use variants to charge for different options – such as engraving length or premium gift wrap types.
Benefits
Enables charging for customisations and add-ons while keeping the data clean and transferable to downstream systems.
Step 1. Create customisations as separate Products
To charge for a customisation, you must create it as a standalone product in the Centra AMS.
- Create a new product: For example, "Gift Wrapping" or "Custom Engraving."
- Use Variants for tiered pricing: If you have different levels of service (e.g., "Standard Wrapping" vs. "Premium Velvet Box"), create these as variants of the same product so they can have distinct prices.
Step 2. Establish links between add-ons and main products via Integration API
With your add-on products created in Centra, the next step is to tell the system which add-ons belong to which main products. These relationships are managed exclusively through the Integration API - the Centra AMS does not provide a UI for this, so your integration owns the full lifecycle of these links.
Linking add-ons when creating a product
If you already know which add-ons a product should offer, you can attach them at creation time by passing addAddons in the createProduct mutation in Integration API. This saves you a second round-trip and keeps the product ready to use from the moment it's active.
Mutation: createProduct
Adding and removing add-on links on an existing product
For products already in Centra, use updateProduct to manage their add-on links. You can add new ones, remove existing ones, or do both in a single call. When both are provided, removals always run first.
Mutation: updateProduct
Querying established links
Two fields on the Product type let you inspect the relationship from either direction. addons returns what's attached to a main product; addonFor tells you which main products a given product is an add-on for. Both support filtering and pagination - useful when a product has a large catalogue of eligible add-ons.
Query: product
Constraints
The API enforces a few rules to keep the relationship model clean. Violations are returned as userErrors and no changes are persisted.
- A product cannot be an add-on if it already has add-ons of its own.
- Product cannot be linked to itself.
Step 3. Build your product details pages with add-ons
Add items from product details pages
When the customer picks the main product and selects add-ons on the product details pages, submit everything in one addItem call. Each entry in add-ons is the item ID from one of the add-on display items. Each add-on entry accepts a quantity field (defaults to 1). If an add-on line for the same item already exists on the parent, the specified quantity is added incrementally to the existing line.
Mutation: addItem
Add add-ons to an existing basket line
Use setLineAddons to attach add-ons to a line that is already in the basket. This is the right mutation when the customer decides to add an add-on after the main product is already in the cart. Each add-on entry accepts a quantity field (defaults to 1). Unlike addItem, the quantity is set directly — it replaces the existing add-on line quantity for the same item rather than adding to it.
Mutation: setLineAddons
Update the quantity on a parent or add-on line
Use updateLine to change the quantity on either the parent line or any of its add-on lines. Every line — parent and add-on alike — has its own id, which you receive in the selection response.
By default, add-on quantities are independent of the parent: updating the parent's quantity leaves its add-ons untouched, and updating an add-on line applies only to that add-on, without affecting the parent or any sibling add-ons.
To override this behavior, set the updateQuantityStrategy field to INCLUDE_ADDONS. When updating a parent line with this strategy, every add-on line is set to the same value passed in the quantity input.
Mutation: updateLine
Step 4. Manage placed orders with paid customisations
Add-on items in a placed DTC order are grouped visually in all order management screens in AMS. Each group is represented by a summary (main) row followed by the individual add-on lines beneath it.
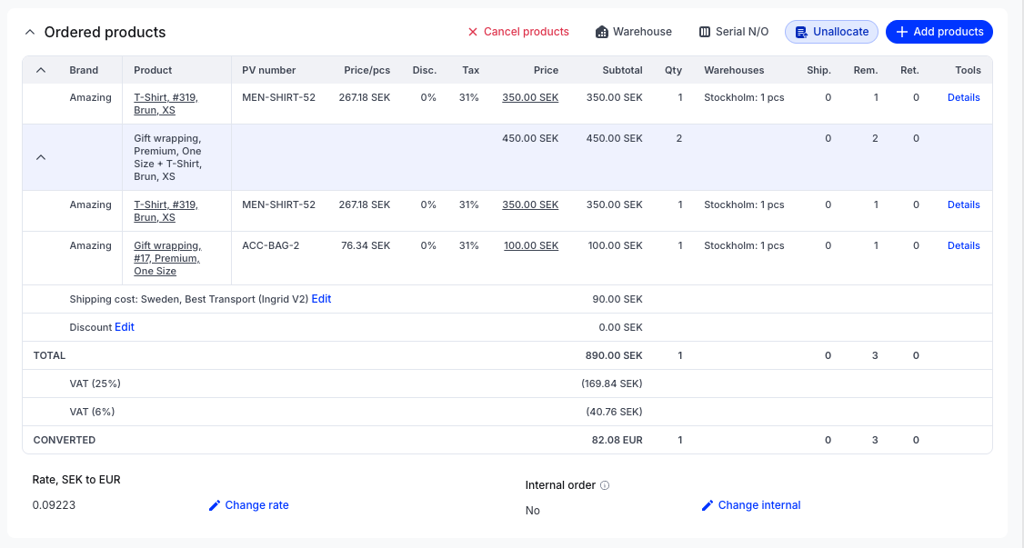
- The main row shows the concatenated names of all add-ons in the group (e.g. "Gift wrapping, M + T-Shirt, M"), along with aggregated totals.
- The child rows are the individual add-on line items. They include the base product that carries the add-ons (the "addon parent") as well as each add-on product.
- Click the chevron icon on the left of the main row to collapse or expand the child rows. All groups can be toggled at once by clicking the chevron in the column header.
Managing add-ons
From an order management perspective, add-on items behave exactly like regular order lines. You can cancel them, ship them (fully or partially), return them, and adjust quantities - all through the same popups and workflows used for regular products. The grouping is shown consistently across all relevant popups.
Integration API
Once an order is placed, add-on lines live alongside their parent line in the order and flow through to shipments, returns, and invoices. The Integration API gives you two ways to work with them, controlled by the includeAddonsAsLines argument on the lines field.
How add-on lines are represented
By default (includeAddonsAsLines: false), Integration API filters add-on lines out of the flat line list and instead nests them under the addons field of their parent line. This keeps the structure clean for downstream systems that want to process one logical item at a time – the parent – and look up its add-ons as a sub-list.
In this mode, the response contains one line per main product. Each line's addons array holds the full line objects for any attached add-ons - the same structure as the parent, with their own productNumber, quantity, unitPrice, and lineValue.
Two aggregate fields make it easy to present or export the combined cost of a parent product and all its add-ons without summing manually. unitPriceWithAddons and lineValueWithAddons both accept an includingTax argument and return a MonetaryValue.
If you'd rather receive a flat list - pass includeAddonsAsLines: true. Add-on lines will appear as regular siblings in the response alongside their parent.
Query: order
Shipments, returns, and invoices
The same includeAddonsAsLines argument and addons field are available on DirectToConsumerShipment, DirectToConsumerReturn, and DirectToConsumerInvoice lines, with identical behavior. lineValueWithAddons and unitPriceWithAddons are also present on all three.
Query: shipment, return, invoice
Shipment creation
There is no validation that enforces add-on lines to be shipped together with their parent. You can create a shipment referencing any combination of order line IDs, including add-on lines in isolation or without their parent.
How to set up unpaid product customisations
This area covers data that doesn’t represent a physical “add-on,” but still affects how an order is fulfilled or handled (think: a non-paid add-on).
How it works:
No separate product is needed — simply attach values directly to the main product line(s) in the storefront.
Benefits:
Enables operational flexibility and supports more personalised customer experiences without altering the product catalogue.
Examples include:
- Gift messaging: storing item-specific notes.
- Fulfillment routing: Tagging lines for different warehouse locations or processing steps (e.g., a “monogramming” station).
- Extended warranties: Linking a warranty ID or warranty terms to a high-value item.
Step 1: Create order line attribute in Centra
To enable order line attributes, you must first create an attribute within the Centra configuration.
- Navigate to System → Configuration in Centra
- Click the
Create attribute typebutton. - Define your custom attribute following the Centra Developer Documentation.
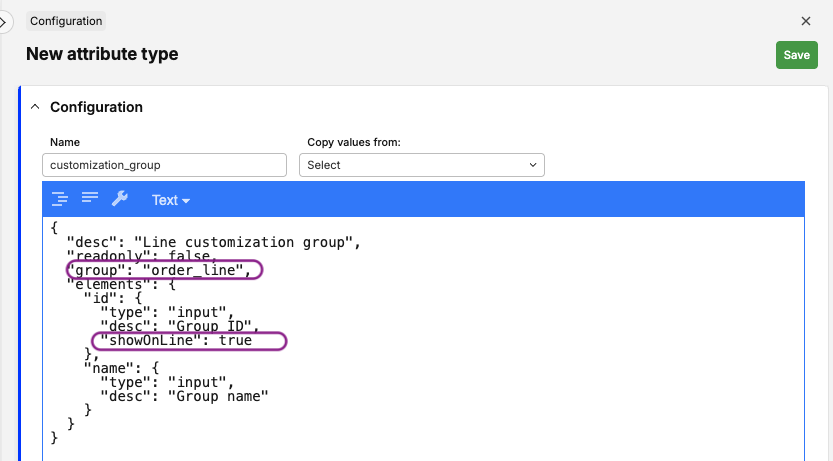
- Set the attribute group to
order_line.
Note that line attributes are restricted to the following types: select, textarea, input, boolean.
Step 2: Configuring order line attributes visibility on the order view
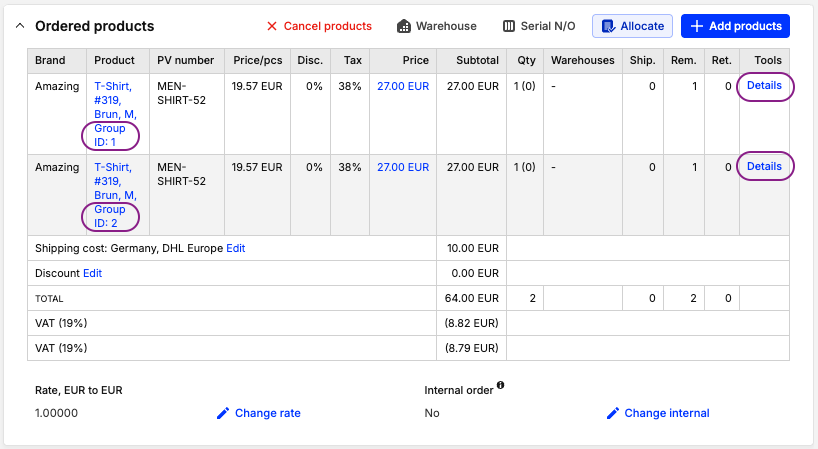
To ensure your customer service and fulfillment teams can see line attributes efficiently, you can configure the attribute visibility by toggling the showOnLine property on specific elements.
| Value | Visibility Behavior |
|---|---|
true | The attribute is displayed immediately in the main Order View. |
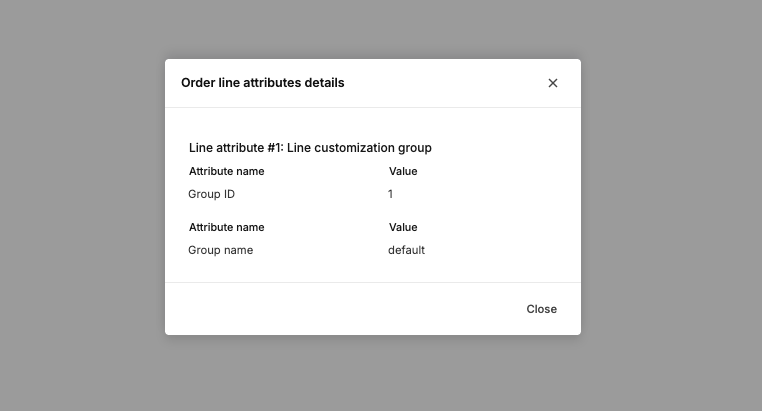
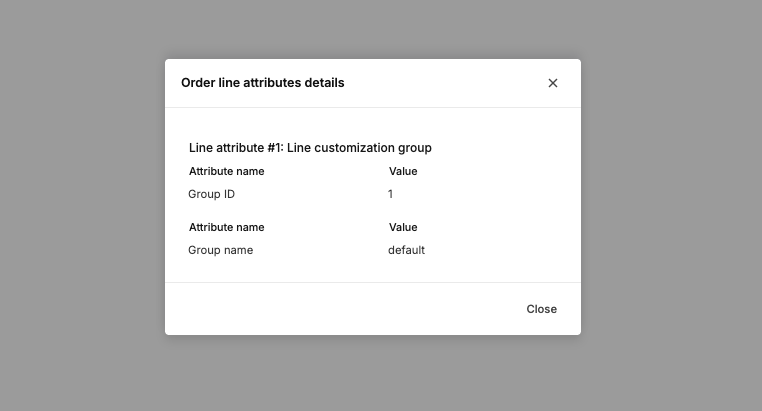
false (default behaviour) | The attribute is hidden in the main view; it is only accessible by clicking the "Details" button on the order line. |
Step 3: Enable attributes in the Storefront API plugin
After configuring the attributes in the configuration view, you must explicitly enable them within the Storefront API plugin to allow attributes to be set via API calls.
- Open your Centra AMS and navigate to the Storefront API plugin settings.
- Locate the Line attributes settings section.
- Enable the specific order line attributes you wish to expose to your frontend.

Note: If an attribute is not enabled within the plugin, the Storefront API will ignore any attempts to pass data for that field, even if it is correctly configured in the attribute types.
Check which attributes are available to be updated via Storefront API
Once your attributes are configured and enabled in the plugin, you can programmatically retrieve them via the Storefront API. This ensures your frontend always knows which attributes are valid to send back in the mutations described in Step 4.
Query: availableLineAttributes
Step 4: Set attributes on order lines via the Storefront API
The Storefront API supports attribute assignment through several mutations. You can define attributes using dynamicAttributes for custom values or mappedAttributes for predefined attributes.
1. How to assign attributes to lines when adding products to a basket?
To attach data to a product line, pass the attribute values when adding the item to the basket
Mutation: addItem
Mutation: addFlexibleBundle
2. How to update order line attributes on existing order lines?
You can update or remove attributes for items already in the cart using setLineAttributes and unsetLineAttributes.
There’s line splitting logic: Without specifying quantity, the entire line is updated. When using quantity parameter, the line is split. One part remains unchanged, while a new line is created for the specified quantity with the updated attributes.
Mutation: setLineAttributes
Mutation: unsetLineAttributes
Assigning attributes to only some products in the order line:
- You can assign attributes to any quantity of a product.
- Assigning different attributes to the same SKU (e.g., two identical shirts with different monograms) will automatically create separate lines in the basket. For example
- Basic T-shirt, Red, Size S - Qty 1 - Embroidery “Moody“
- Basic T-shirt, Red, Size S - Qty 1 - Embroidery “Grumpy“
- Essentially, if there are any differences in attributes for the same product, it will always be split into multiple lines. But if the attributes are the same, it will remain as one line on the basket and later the order.
Step 5: Order management and export
Once the order is placed, line attributes are displayed in Centra according to your visibility settings.
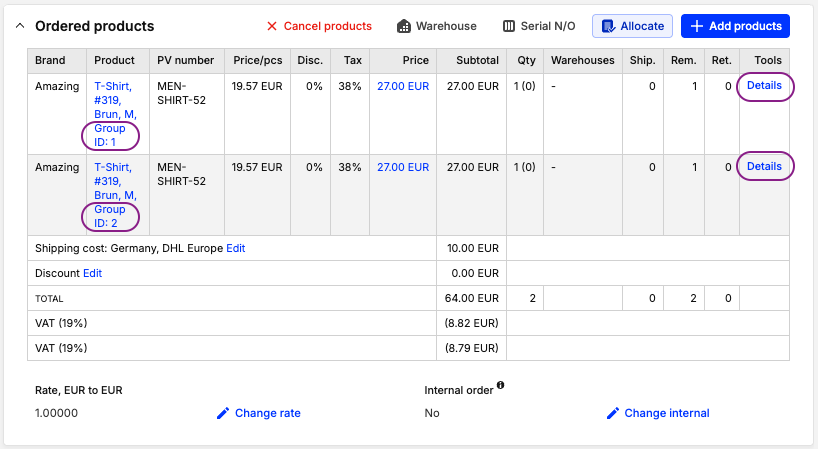
Attribute elements with showOnLine: true are included in line product name.
Integration API export
When fetching orders via the Integration API, all line attributes are included on the order line objects so downstream systems (ERP/WMS) can consume the customisation/operational metadata.
query orderAttributes($number: Int) {
    order(number: $number) {
        lines {
            attributes {
                ... on MappedAttribute {
                    id
                }
                type {
                    name
                    isMulti
                }
                elements {
                    key
                    description
                    kind
                    ... on AttributeStringElement {
                        value
                    }
                    ... on AttributeChoiceElement {
                        selectedValue
                        selectedValueName
                        isMulti
                    }
                }
            }
        }
    }
}
Email provider integrations
Order line custom attributes are forwarded to email providers so you can include personalisation data in transactional emails.
Voyado — attributes are sent as key-value pairs inside extraData on each item:
"items": [
  {
    "extraData": {
      "engraving_text": "Happy Birthday!",
      "gift_wrap_style": "Premium"
    }
  }
]
Klaviyo — attributes are sent inside an Attributes object on each item:
"Items": [
  {
    "Attributes": {
      "engraving_text": "Happy Birthday!",
      "gift_wrap_style": "Premium"
    }
  }
]
Rule — attributes are sent as top-level properties on the product object:
"Products": [
  {
    "engraving_text": "Happy Birthday!",
    "gift_wrap_style": "Premium"
  }
]
Step 6: Updating attributes post-purchase
Currently, updating order line attributes after an order is placed is only possible via the Integration API, and not possible in the Centra order view.
Supported patterns:
- Full line updates: Update all attributes on a line.
- Partial updates by quantity: If a line has quantity 5 but only 1 unit needs a change, the API can support splitting the line or targeting a partial quantity.
Mutation: assignAttributes
Mutation: unassignAttributes
How to modify attributes for only a fraction of a line item?
When you need to modify attributes for only a fraction of a line item (e.g., changing the customisation for 1 unit out of an existing 5), the system utilizes an atomic Cancel-and-Add workflow via the updateDirectToConsumerOrder mutation.
Instead of "editing" the existing line, you are essentially splitting it: removing the target quantity from the original line and instantly replacing it with a new, correctly configured line.
Mutation: updateDirectToConsumerOrder
Core Principles for Success
Because this operation creates a brand new line, keep these technical requirements in mind:
- No Attribute Inheritance: The system will not copy attributes from the original line. You must explicitly provide the full set of required attributes in the
addLinesblock. - Data Consistency: To maintain order integrity, you must manually ensure the
displayId,sizeId,unitPriceand any other custom field match the original line exactly. - Status: Orders can only be modified until they have been shipped.
- Allocation: Following a split, each new line requires an independent allocation.
Allocation
Once a new line with updated attributes is added, it must be allocated from the same warehouse as the cancelled line.
Mutation: allocateOrder