Adyen Express checkout
This guide will instruct you on how to implement Adyen Express Checkout in your store. This way of paying for the order is different from how Centra usually collects payment: it allows you to obtain a customer's address directly from Google or Apple instead of collecting it in a separate step in the checkout process.
Currently we support two payment methods via Express Checkout:
- Google Pay (or
GP), - Apple Pay (or
AP).
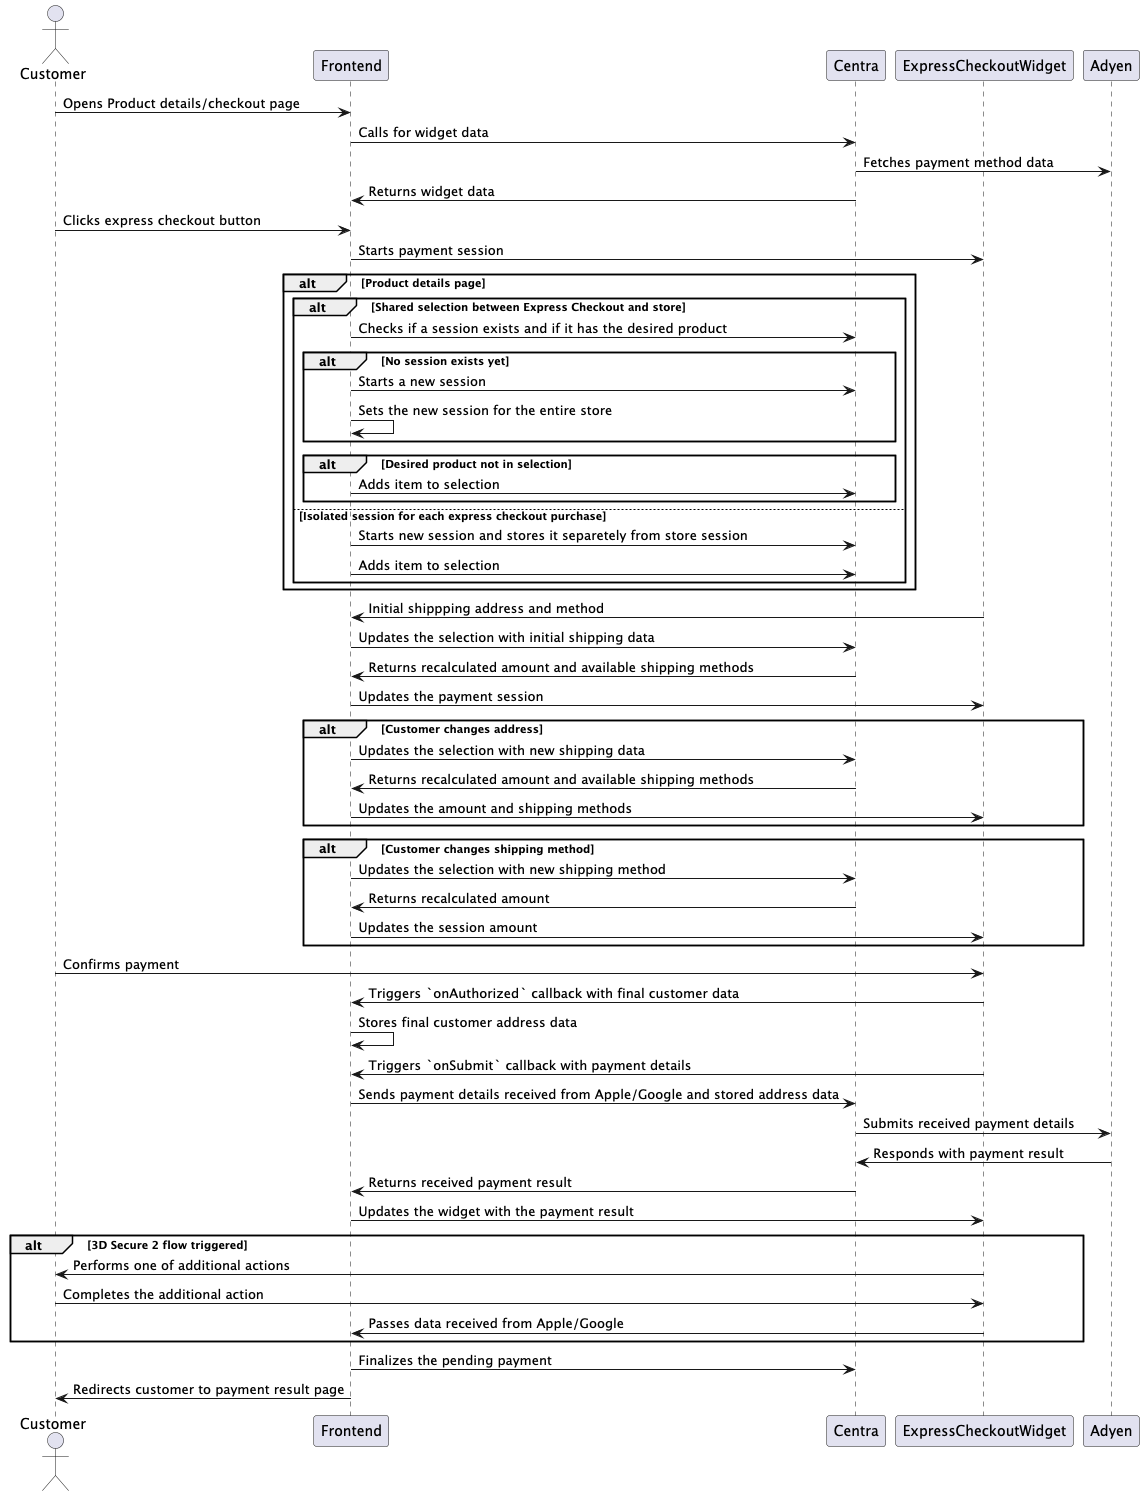
Below you can find a diagram explaining how the overall flow of Express Checkout looks like.
Contexts
Before we go into implementation details, let us first break down an important aspect of Express Checkout. In general, it can be used as part of the standard checkout process and be included in the basket widget or checkout page. However, it also unlocks the ability of an express purchase from the product details page, called PDP from now on. This means we have two distinct contexts: Checkout and PDP.
There is not much additional work related to the Checkout context. There is, however, additional work required to handle the selection for PDP context: initializing the selection should be delayed until the payment sheet widget is actually opened.
Implementation
In order to start working on your implementation, you will need to retrieve a configuration JSON. It contains values necessary to initialize the HTML widget. See below how to call the endpoint to receive only the minimal configuration required:
Query:
{
  expressCheckoutWidgets(
    plugins: [{
      uri: "<plugin uri>",
      additionalData: {
        returnUrl: "<return url>",
        // line items are used for display only, so the price should be already be formatted
        amount: 10000,
        lineItems: [{ name: "Product", price: "100.00" }]
      }
    }]
  ) {
    list {
      name
      widgets {
        name
        contents
      }
    }
    userErrors {
      message
      path
    }
  }
}
Response:
{
  "data": {
    "expressCheckoutWidgets": {
      "list": [
        {
          "name": "<plugin uri>",
          "widgets": [
            {
              "name": "express_checkout_adyen_<apple_pay|google_pay>",
              "contents": "<script contents>"
            }
          ]
        }
      ],
      "userErrors": [
        // will be an empty list for successful requests
        {
          "message": "<error message>",
          "path": ["<error path>"]
        }
      ]
    }
  },
  "extensions": {
    "token": "<session token>"
  }
}
JSON configuration contents
{
  "context": "<test|live>",
  "country": "<country id>",
  "languageCode": "<language code>",
  "shippingMethods": [
    {
      "id": "<shipping method id>",
      "label": "<price>: <name>",
      "description": ""
    }
    // other methods ...
  ],
  "modificationAmount": {
    "amount": 10000,
    "currency": "<currency code>"
  },
  "billingPhoneNumberRequired": "<defined in API plugin configuration>",
  "shippingPhoneNumberRequired": "<defined in API plugin configuration>",
  "paymentMethodsResponse": {
    "paymentMethods": [
      {
        "configuration": {
          "merchantId": "<merchant id>",
          "gatewayMerchantId": "<gateway merchant id>"
        },
        "name": "Google Pay",
        "type": "<paywithgoogle|googlepay>"
      }
    ]
  },
  "clientKey": "<client key>",
  "paymentMethod": "<plugin uri>"
}
Remaining steps
Follow the instructions provided by Adyen on how to create the payment sheet widget for Apple Pay and Google Pay:
Below you can find general advice on implementing the logic:
- You need to update the selection data on payment sheet initialization and address update. Set the received address data on the selection and it will calculate the new amount and available shipping methods. You would use the following callbacks to receive the selected address data:
- Google Pay -
paymentDataCallbacks -> onPaymentDataChanged - Apple Pay -
onShippingContactSelected
- Google Pay -
- Changing the shipping method also requires you to update the selection. The callbacks here are:
- Google Pay -
paymentDataCallbacks -> onPaymentDataChanged - Apple Pay -
onShippingMethodSelected
- Google Pay -
- When customer confirms the payment, it is split into two, potentially three callbacks:
onAuthorized-> this callback is fired first and receives the final customer data (shipping address and method, email, etc.). You should store the selection data received here, but there is no way of updating the payment amount anymore.onSubmit-> this callback receives payment data from PSP, which needs to be passed to the backend. Then the data received from Adyen should be used to finish the payment inside of the payment sheet.- [Google Pay only] After
onSubmit, depending on the context of the payment and risk configuration in the merchant account, 3D Secure 2 flow may be triggered. This will require theonAdditionalDetailscallback to be handled.
- Once the payment is handled, the customer should be redirected to the payment confirmation page. This would happen in the
onPaymentCompletedcallback. Shipping address/method updates errors should be displayed in the payment sheet. Payment failures should cause the customer to be redirected to the payment failed page. - If any action needs to be performed when the widget is closed, the
onErrorcallback can be used.
onError = (error, component) => {
  if (error.name === 'CANCEL') {
    // perform additional actions
  }
};
Below is a table summarizing the above:
| Callback | Mutation to call |
|---|---|
GP: paymentDataCallbacks -> onPaymentDataChanged, AP: onShippingContactSelected | paymentInstructions with { paymentInitiateOnly: true } |
GP: paymentDataCallbacks -> onPaymentDataChanged, AP: onShippingMethodSelected | setShippingMethod with { id: $shippingMethodId } |
| onAuthorized | no call, but address data needs to be stored until centra_express_checkout_payment_callback event |
| onSubmit | paymentInstructions with details received from the PSP |
| onAdditionalDetails | paymentResult with data received from the callback event |
Ingrid compatibility
Unfortunately, in its current state the Ingrid plugin is not usable with Express Checkout. Ingrid has its own frontend widget that the customer needs to interact with in order to get the shipping options. There is no way to make it compatible with the Express Checkout widget. This means that orders placed via the Express Checkout widget can only utilize the standard Centra shipping options. Moreover, if the plugin is enabled, it will interfere with the Express Checkout orders. It will communicate with Ingrid and also update the selection with default shipping option and other relevant attributes. There are three places where such interference happens:
- When initializing the selection with items
- Submitting address submission
- Finalizing the payment
Because we cannot disable this behaviour by default, a workaround was required. These are the necessary steps you will need to perform in order for Express Checkout to not be negatively impacted by an enabled Ingrid v2 plugin:
- When initializing the widget for the first time, fetch the first shipping method from the selection response and perform the
setShippingMethodmutation with{ id: $shippingMethodId }. - Every
paymentInstructionssubmission (either address data or the payment response from PSP) should containpaymentMethodSpecificFields.express: true. This will inform Centra that Ingrid should not be involved. - Every
paymentResultsubmission (e.g. when redirecting the customer to the payment confirmation page) should containpaymentMethodFields.express: trueThis will inform Centra that Ingrid should not be involved.
With these steps in place the Express Checkout order will be placed outside of Ingrid. If you are depending on Ingrid as an important part of your checkout process, this will probably prevent you from using Adyen’s Express Checkout at all.