Stripe Payment Intents
Last updatedThe Stripe Payment Intents-plugin is allowing you to render payment components on the checkout page that will bypass the checkout and use the browser's own Payment Request API. This allows you to use the Apple Pay and Google Pay button on your website for fast checkout.
Google Pay:

Apple Pay:

Limitations#
The Payment Request API used for the payment buttons has a big limitation when changing address information in the popup, it cannot switch the current currency of the order. This means that the code Centra uses to update the payment request will trigger a failure if the address and country selected in the browser popup result in a currency change.
When the address is changed in the browser popup an event will still be sent to the website to update the country against Centra, but as soon as it results in a currency change, the customer will see this:
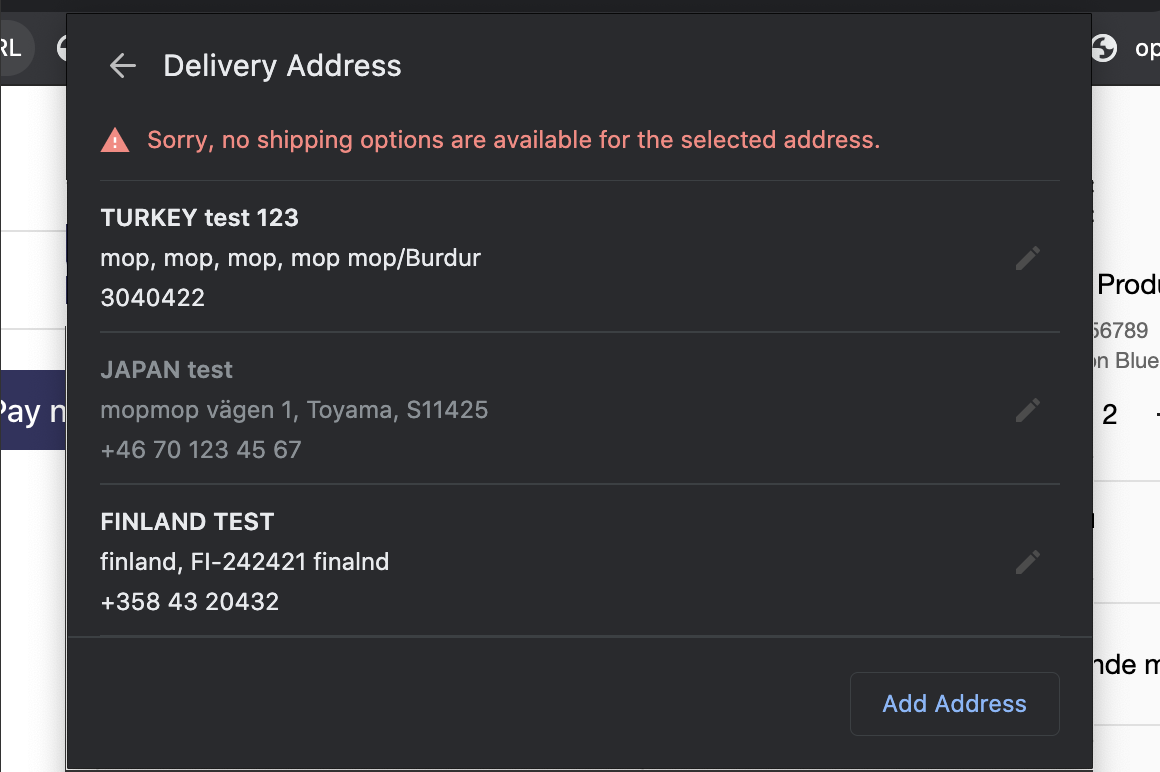
This makes it really important that the proper country is selected before the payment button is launched, as any address that requires the currency to change will get this error. We recommend always having the country selector as the first step in the checkout, to make sure the proper currency is set.
This restriction might change in the future if the Payment Request API will support changing currency.
Set up#
To configure Stripe Payment Intents plugin in Centra go to store plugins, select desirable plugin and you should see similar screen to the screenshot below.
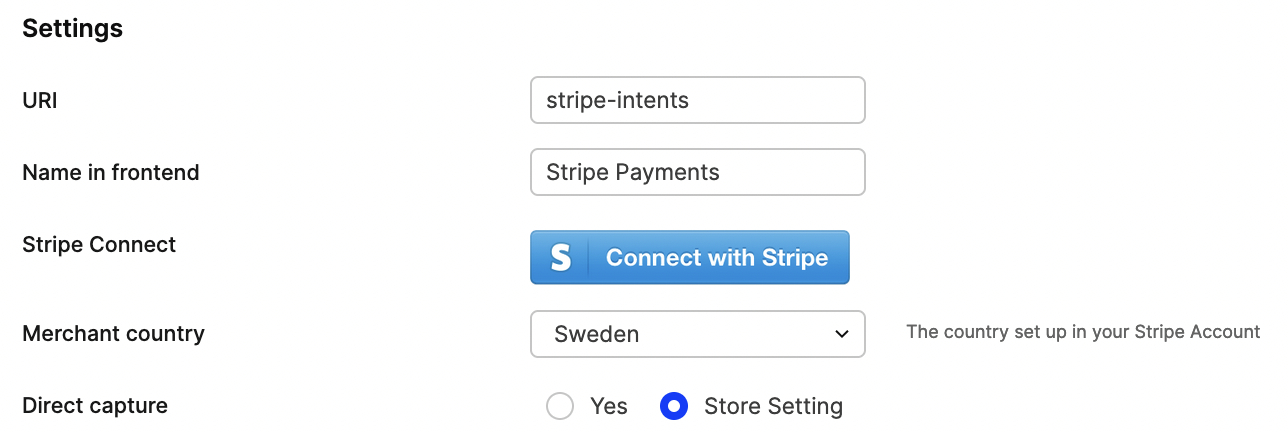
To connect your account just click Connect with stripe button and follow steps on Stripe page. This operation will bind your account with Centra's. After this you can start using Stripe Payments.
Depending on the "Test-Mode" selected, the connection will either be made to your Stripe Test account or your production account.
You can also restrict the Stripe Checkout to only work for specified markets, pricelists, countries or languages.
Payment option#
The Stripe Checkout plugin will show up in the API as a payment method:
1
2
3
4
5
6
7
"stripe-payment-intents": {
    "paymentMethod": "stripe-payment-intents",
    "paymentMethodType": "stripe_payment_intents",
    "name": "Stripe Checkout",
    "supportsInitiateOnly": true,
    "providesCustomerAddressAfterPayment": false
},
If you're using it strictly for showing a Payment Button, you need to ignore showing this payment method in the list of payments you show to the customer. Since the complete payment flow is completed by clicking the button, there's no reason to select this payment method. You can just show the button directly above the other payment methods.
Apple Pay#
To enable Apple Pay (both for Live and Test):
- Add domain in Stripe
- Upload certificate to the domain that will host the checkout page to the following location:
.well-known/apple-developer-merchantid-domain-association - Click on Validate inside Stripe to validate that the domain was verified with Apple.
- Wait a few hours for it to kick in.
This will allow you to see the Apple Pay button if you have a supported device.
When you're using the Test-Mode in Centra connected to your Stripe Test account, no charges will be made when you pay through Apple Pay.
Configuration of Stripe Payment Intents#
Make sure you have defined the Merchant-country in the Centra plugin which should match the country set for your business information in Stripe.
Flow#
The flow works like this:
- Customer adds products to their cart. The country is either selected by the customer or selected by Geo-IP (based on the IP-address of the customer).
- The website makes a
POST /paymentrequest with theaddress.country(andaddress.state, if state is selected) for the customer, together with apaymentInitiateOnly:true-parameter. This tells Centra not to set the payment option as the selected one (since the payment button is selected opt-in by the customer when pressing it). This call can be made directly when the user accesses the checkout page. - Centra will return a snippet that will try to launch the payment request button inside its own
<div>provided in the snippet. You can also set the selector of the payment button by setting thewindow.stripeRequestButtonSelector-variable in the DOM. - If the browser of the customer allows a Payment Request button to launch, the button will show up. There are a few reasons why the button would not show up (not enabled by the customer, browser not supported), so the design of the checkout needs to support the button not being initiated. When you're developing your checkout you can also see notifications in the developer-console in the browser why the payment button failed to launch.
- If the customer changes anything in their selection, such as the quantity for a product, a similar
POST /paymentcall as explained in #1 needs to run to reload the payment button snippet with the proper amount set. - If the customer clicks the button, there are certain selections the customer can do in the payment popup to modify the order. All of the customer's actions trigger specific events that need to be handled according to the flows below.
Checkout API flow#
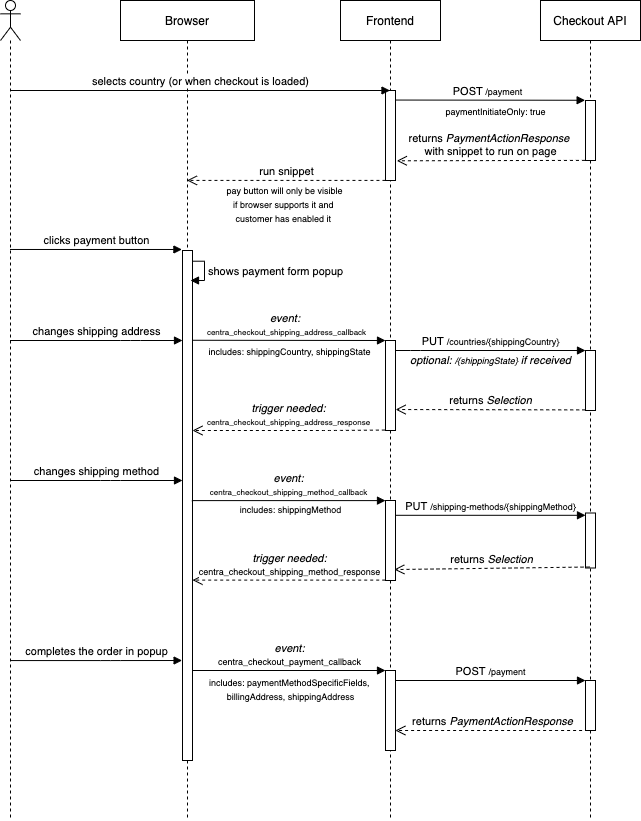
Shop API flow#
The whole flow for Shop API is really similar to Checkout API. The main difference is that it's your backend making the API-calls to Centra instead of the Frontend.
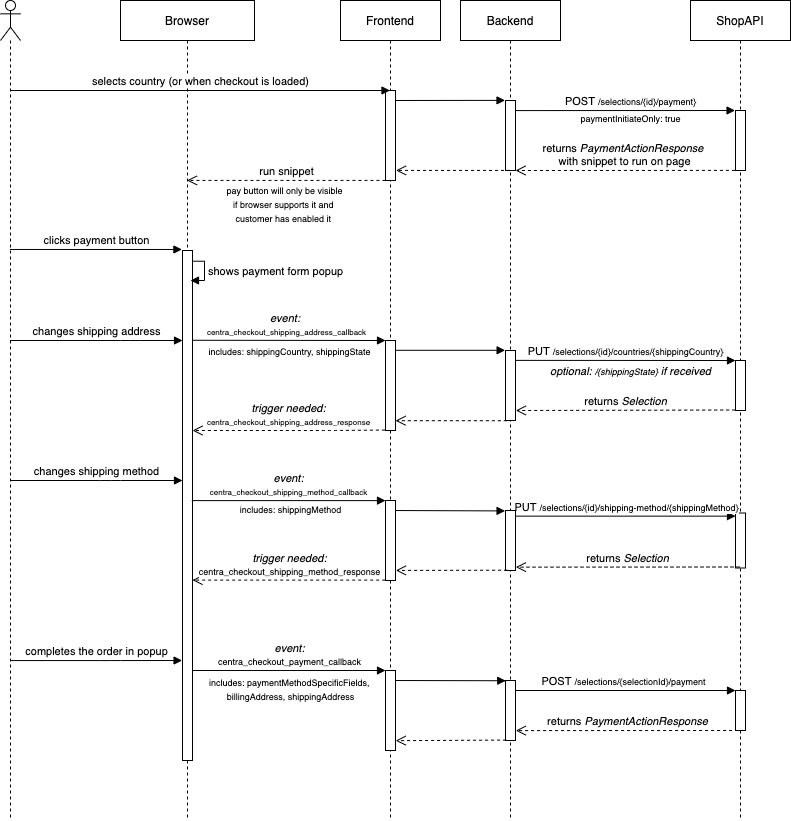
Events#
Since Centra does not know how you make requests to the API, you need to listen to events from the payment button and trigger API-calls to Centra based on what they are used for. Stripe Payment Intents can trigger 3 different events. Changing shipping address, changing shipping method, and completing the payment.
For changing the shipping address and shipping method, you need to receive the event and make API-requests to Centra to change these settings for the selection.
For completing the payment, you post it just like a regular POST /payment to finalize the order by using the parameters provided, including the billingAddress and shippingAddress. The important one is the paymentMethodSpecificFields that contain the data to finalize the order.
| Event to handle | Parameters | Response event needed |
|---|---|---|
centra_checkout_shipping_address_callback | shippingCountry shippingState shippingZipCode | centra_checkout_shipping_address_response |
centra_checkout_shipping_method_callback | shippingMethod | centra_checkout_shipping_method_response |
centra_checkout_payment_callback | responseEventRequired:false addressIncluded:true paymentMethod billingAddress shippingAddress paymentMethodSpecificFields | Make a regular POST /payment, similar to when checkout is submitted, but with the params provided from the event. |
For changing shipping address and shipping method, you also need to respond back with parts of the Selection-model that Centra gave back on those requests. All data needed for the event exists inside the response, and you can reuse the same event trigger for both events.
The response event needs an object like this:
1
2
3
4
5
6
7
8
const returnObject = {
    country: location.country,
    currency: selection.currency,
    currencyDenominator: selection.currencyFormat.denominator,
    grandTotalPriceAsNumber: selection.totals.grandTotalPriceAsNumber,
    shippingMethod: selection.shippingMethod,
    shippingMethodsAvailable: shippingMethods
}
Fields from Selection-model in CheckoutAPI#
| Return Object field | Field inside Selection-response |
|---|---|
country | location.country |
currency | selection.currency |
currencyDenominator | selection.currencyFormat.denominator |
grandTotalPriceAsNumber | selection.totals.grandTotalPriceAsNumber |
shippingMethod | selection.shippingMethod |
shippingMethodsAvailable | shippingMethods |
Fields from Selection-model in ShopAPI#
| Return Object field | Field inside Selection-response |
|---|---|
country | country |
currency | currency |
currencyDenominator | currencyFormat.denominator |
grandTotalPriceAsNumber | totals.grandTotalPriceAsNumber |
shippingMethod | shippingMethod |
shippingMethodsAvailable | shippingMethodsAvailable |
If an error occurred while handling the event, the response should be handled with the following object, this will make sure the payment popup understands something went wrong:
1
2
3
const returnObject = {
    error: true
}
You create a new DOM-event by doing this:
1
2
    const shippingUpdateEvent = new CustomEvent('centra_checkout_shipping_address_response', { detail: returnObject });
    document.dispatchEvent(shippingUpdateEvent);
The payment button initialized will then update accordingly based on the content of the event.
Testing#
Before you start testing make sure that you have Test-Mode: Yes set in the plugin configuration.
You can then use the test-cards provided by Stripe to place test orders. For Apple Pay, you can use your regular card when making a purchase through the test-mode, but no charge will be made to your card. For Google Pay, you can add the test cards by going to chrome://settings and selecting Payment Methods and adding one of the test cards provided by Stripe. You should test both the regular flow and the 3D-secure flow.
Example implementation#
We will now explain a regular checkout that includes the payment button. In this case it's for CheckoutAPI, but the same thing applies to ShopAPI, only the way the API is called differs (since ShopAPI is strictly server-side). This example shows how to do it with React.
When the customer goes to the checkout, you make a GET /selection call to fetch the current selection from Centra.
When to launch the payment button component#
In the response, you might see that the payment button is available as a payment method:
1
2
3
4
5
6
7
8
{
    "paymentMethod": "your-uri-of-payment-plugin",
    "name": "Stripe Payments",
    "paymentMethodType": "stripe_payment_intents",
    "providesCustomerAddressAfterPayment": false,
    "handlingCost": "0.00 SEK",
    "handlingCostAsNumber": 0
}
Because you found a payment method in the paymentMethods-list with paymentMethodType: stripe_payment_intents, you will try to enable the payment button component if it was found. In React code it will look something like this:
1
2
3
4
5
6
7
8
9
10
11
12
13
14
15
16
17
// in utils:
const PaymentButtonMethodType = 'stripe_payment_intents';
export const paymentButtonData = (paymentMethods: IPaymentMethod[]): IPaymentMethod => {
  return paymentMethods.filter((element: IPaymentMethod) => element.paymentMethodType === PaymentButtonMethodType)[0];
};
export const isPaymentButtonAvailable = (paymentMethods: IPaymentMethod[]): boolean => {
  return !!paymentButtonData(paymentMethods);
};
...
// in <Checkout> component:
const paymentButtonEnabled = isPaymentButtonAvailable(data.paymentMethods); // bool if payment button exists
const paymentButton = paymentButtonData(data.paymentMethods); // returns the object in the list of payments
...
// show payment intents component only if it is currently available
{paymentButtonEnabled && (
<StripePaymentIntents selectedPaymentMethod={paymentButton} />
)}
Button component initialization#
The StripePaymentIntents-component would then make the load request:
1
2
3
componentDidMount() {
  this.props.fetchStripePaymentIntentsWidgetRequest();
}
The fetchStripePaymentIntentsWidgetRequest would trigger the POST /payment to Centra like this:
1
2
3
4
5
6
{
  "paymentReturnPage": "https://example.com/",
  "paymentMethod": "your-uri-of-payment-plugin",
  "paymentInitiateOnly": true,
  "address": {"country": "SE"}
}
You need to provide the country to make sure Centra gives back a payment button with the proper currency, this is also why you need the country selector at the top of your checkout.
You will get back a snippet, like this:
1
2
3
4
5
6
7
8
9
10
11
{
    "action": "form",
    "formHtml": "<script type=\"application/json\" id=\"stripe-parameters-fv9pnkrbvhlgkf...",
    "formType": "stripe-payment-intents",
    "formFields": {
        "publishableKey": "pk_test_07,,,",
        "stripeParameters": "{\"totalAmount\":20000,\"currency\":\"sek\",\"country\":\"SE\",\"returnUrl\":\"https:\\/\\/example.com\\/?centraPaymentMethod=stripe-pi\"}",
        "externalScript": "https://js.stripe.com/v3/",
        "clientSecret": "pi_1Gj0B9Kecatv..."
    }
}
According to stripe documentation: clientSecret needs to be protected. Do not log it, embed it in URLs, or expose it to anyone but the customer.
You would then update your props, and run a widget inside the render-function.
1
2
3
4
5
6
7
  render() {
    const snippet = formActionSnippet.formHtml; // `formHtml` from the response above.
    if (!snippet) { return null; }
    return (
      <Widget snippet={snippet} evaluateDelay={300} />
    );
  }
You can decide here if you want either to initiate the Stripe Checkout by listening on the formType-field saying stripe-payment-intents and initiate your own Stripe Payment Button using the formFields->externalScript defined, or just render the formHtml. The formHtml will make it easy for you to get the proper events handled, and will support being reloaded multiple times.
The formHTML looks similar to this:
1
2
3
4
5
6
7
8
9
10
11
12
13
14
15
16
17
18
19
20
21
22
23
24
25
26
27
28
29
30
31
32
33
34
35
36
37
38
<script type="application/json" id="stripe-parameters-fv9pnkrbvhlgkfh9cjlld8wep1hzrhous5at4cr">
{"totalAmount":20000,"currency":"sek","country":"SE","returnUrl":"https:\/\/example.com\/?centraPaymentMethod=stripe-pi"}
</script>
    <div id="stripe-button-fv9pnkrbvhlgkfh9cjlld8wep1hzrhous5at4cr" class="stripe-payment-button" style="display: none"
        data-return-url="https://example.com/?centraPaymentMethod=stripe-pi"
        data-publishable-key="pk_test_xxx"
        data-secret="pi_xxx">
    </div>
<script>
function loadStripe() {
  if (window.StripeIsLoading) {
    return;
  }
  if (typeof window.Stripe === 'function') {
    stripeButtonInit();
    return;
  }
  window.StripeIsLoading = true;
  var newScript = document.createElement('script');
  newScript.async = true;
  newScript.src = 'https://js.stripe.com/v3/';
  newScript.onload = stripeButtonInit;
  if (document.children) {
      document.children[0].appendChild(newScript);
  } else {
      document.body.parentNode.appendChild(newScript);
  }
}
function stripeButtonInit() {
  // init stripe button
  var buttonElement = window.stripeRequestButtonSelector || '#stripe-button-' + randomId;
  var paymentRequest = stripe.paymentRequest({
  ..
  });
}
...
loadStripe();
</script>
This formHtml will:
- Initiate Stripe Payment Intents on the domain.
- Initiate DOM-events whenever the customer changes shipping address or shipping method inside the Payment Request flow when clicking on the button. These events are made for you to listen to and to make additional API-calls. The events might also need you to respond with a new DOM-event for the Payment Request flow to be reloaded.
If you will use the formHtml-snippet, you need to make sure you insert the HTML into your DOM, and also make sure you evaluate the javascript from the response.
Since we need to control the DOM in this case, the dangerouslySetInnerHTML needs to be used for you to render the DOM given by Centra properly (and to inject the scripts needed). In your Widget-component, you would do this:
1
2
3
4
5
6
7
8
9
10
componentDidUpdate() {
  const { onUpdate } = this.props;
  setTimeout(() => { evaluate(this.frame); }, this.state.evaluateDelay);
  if (onUpdate) {
    setTimeout(() => { onUpdate(); }, this.state.evaluateDelay + 100);
  }
}
render() {
  return (<div dangerouslySetInnerHTML={{ __html: snippet }} />)
}
This snippet would then evaluate the Javascript added to the DOM:
1
2
3
4
5
6
7
8
9
10
11
12
13
14
15
16
17
18
19
20
21
22
23
24
// in utils:
export const evaluate = (subtree: any, context: {} = window) => {
  function getSnippetType(script: any) {
    return script.type || '';
  }
  function getRawSnippet(script: any) {
    return script.text || script.textContent || script.innerHTML || '';
  }

  if (subtree) {
    try {
      const scripts = subtree.getElementsByTagName('script');
      const scriptsAsArray = Array.from(scripts).filter(script => getSnippetType(script) !== 'application/json');

      scriptsAsArray.forEach((script) => {
        const unescaped = getRawSnippet(script).replace(/\\/gi, '');
        eval.call(context, unescaped);
      });
    } catch (error) {
      // tslint:disable-next-line:no-console
      console.error('Catched error in evaluate function:', error);
    }
  }
};
This will make sure that:
- You do not evaluate
type=application/jsonblobs from Centra. - The proper snippet will run after the DOM has changed.
Adding the additional events#
The code now supports you in launching the button. But we also need to make sure the events triggered by the interactions by the customer when using the button are handled. We already registered the events in the componentDidMount, but we should also make sure they are handled, and also triggers responses.
First, we make sure "Changing shipping country" and "Changing shipping method" works. Let's add these two to the componentDidMount of the StripePaymentIntents-component
1
2
3
4
5
6
7
8
componentDidMount() {
  this.props.fetchStripePaymentIntentsWidgetRequest(); // this was here from before to initialize the button
  document.addEventListener('centra_checkout_shipping_address_callback', this.updateShippingAddress);
  document.addEventListener('centra_checkout_shipping_method_callback', this.updateShippingMethod);
}
updateShippingAddress = (event: any) => {

}
We then start to handle the updateShippingAddress. We know that we will get shippingCountry and an optional shippingState to the event provided. We should also expose two different requests we can do. One when a state is selected and required by Centra, and one with only changing country.
1
2
3
4
// in StripePaymentIntents-component:
const { countryChangeRequest: countryChange, countryStateChangeRequest: countryStateChange } = this.props;

const { shippingCountry, shippingState } = event.detail;
We can then run these two different requests based on if the shippingState was provided:
1
2
3
4
5
6
7
8
9
10
11
12
13
14
15
if (shippingState) {
    countryStateChange({
        countryCode: shippingCountry,
        stateCode: shippingState,
        formName: FormNames.shippingAddress,
        onComplete: this.changeShippingAddressCompleted
    });
} else {
    countryChange({
        countryCode: shippingCountry,
        formName: FormNames.shippingAddress,
        onComplete: this.changeShippingAddressCompleted
    });
  }
}
We also add the onComplete here for the response action to directly give us a callback when the response is back. This could be done using additional actions also, but this is to simplify the flow.
When the countryChange-action is triggered, we run an API-call to Centra to change the country. We will run the onComplete here.
Also, note that this countryChange-action could be used elsewhere, so it will also trigger the fetchStripePaymentIntentsWidgetRequest-action, which makes the POST /payment-flow to re-initalize the payment button in the DOM.
This has no effect on the running payment request, and this will just make sure that if the customer closes the payment request, the payment button will contain proper data if it's clicked once again. A similar kind of functionality should also be added to the actions changing the quantity of items in the checkout, changing shipping method, or adding and removing vouchers.
1
2
3
4
5
6
7
8
9
10
fromPromise$(rest.httpPut(`/countries/${action.payload.countryCode}`))
.pipe(
  flatMap((response: AxiosResponse<ICountryChangeSuccessPayload>) => {
    const paymentButtonAvailable = isPaymentButtonAvailable(response.data.paymentMethods);
    if (onComplete) { onComplete(response.data); }
    return concat$(
      of$(countryChangeSuccess(payload)),
      if$(() => paymentButtonAvailable, of$(fetchStripePaymentIntentsWidgetRequest()), empty$())
    );
  })
The onComplete-triggers our changeShippingAddressCompleted function with the response data. This function will be the one triggering the centra_checkout_shipping_address_callback to update the payment request.
1
2
3
changeShippingAddressCompleted = (response: any) => {
  this.sendCentraEvent('centra_checkout_shipping_address_response', response);
}
And this will be our sendCentraEvent-wrapper:
1
2
3
4
5
6
7
8
9
10
11
12
13
14
15
16
17
18
19
sendCentraEvent = (eventType: string, data: any) => {
  let returnObject = {};
  if (data && data.selection && data.selection.totals) {
      returnObject = {
          country: data.location.country,
          currency: data.selection.currency,
          currencyDenominator: data.selection.currencyFormat.denominator,
          grandTotalPriceAsNumber: data.selection.totals.grandTotalPriceAsNumber,
          shippingMethod: data.selection.shippingMethod,
          shippingMethodsAvailable: data.shippingMethods
      };
  } else {
      returnObject = {
          error: true
      };
  }
  const shippingUpdateEvent = new CustomEvent(eventType, { detail: returnObject });
  document.dispatchEvent(shippingUpdateEvent);
}
This means we will send back an error-event if we did not get any selection or selection.totals in the response, to make the payment request fail.
We can now do a similar implementation to "Change shipping method". We would add our updateShippingMethod to the StripePaymentIntents-component:
1
2
3
4
5
6
7
updateShippingMethod = (event: any) => {
  const { shippingMethodChangeRequest: shippingMethodChange } = this.props;
  shippingMethodChange({
      shippingMethod: event.detail.shippingMethod,
      onComplete: this.changeShippingMethodCompleted
  });
}
And in our shippingMethodChange-action we would instead:
1
2
const { shippingMethod, onComplete } = action.payload;
return fromPromise$(rest.httpPut(`/shipping-methods/${shippingMethod}`))
The onComplete: thischangeShippingMethodCompleted would run with the payload provided when completed and we would just trigger our sendCentraEvent-trigger with a different event type:
1
2
3
changeShippingMethodCompleted = (response: any) => {
  this.sendCentraEvent('centra_checkout_shipping_method_response', response);
}
You should now be able to launch the payment button, change the address inside it, and select the different shipping options available. This should also reload the total amount of the request:
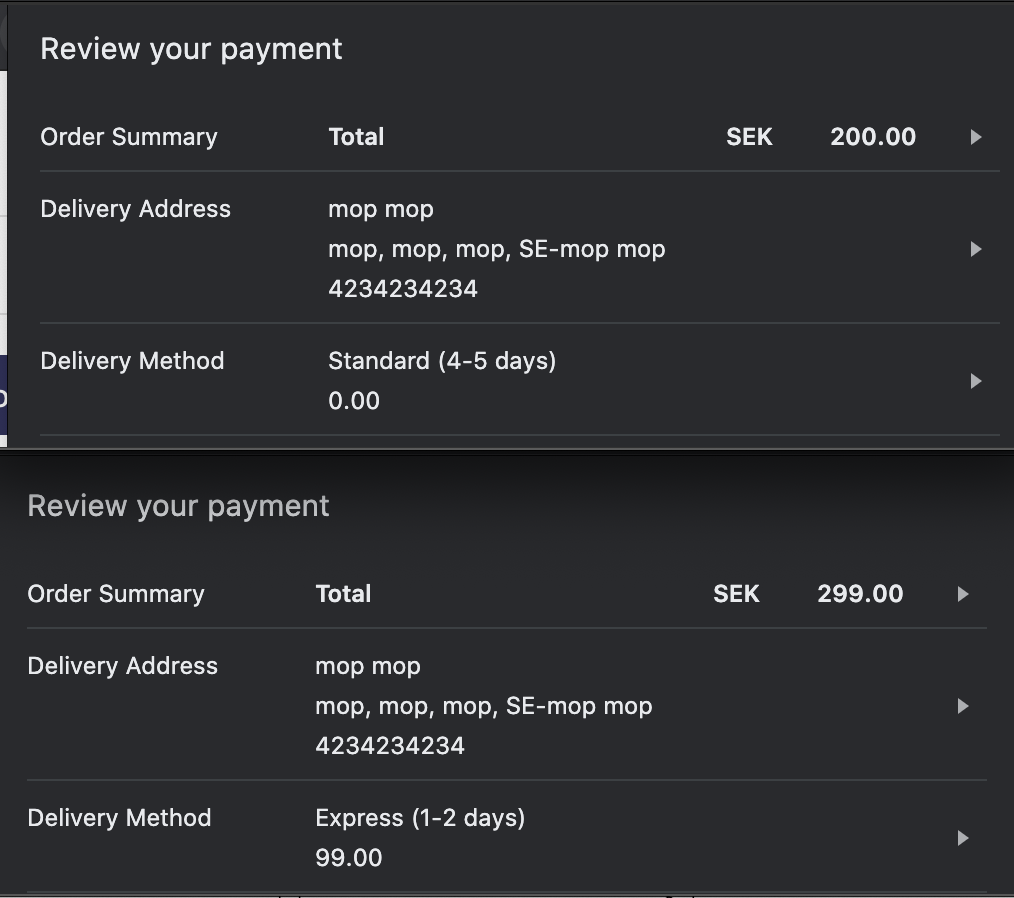
Payment finalization#
We will now handle the final event happening when payment is completed in the popup by the customer. The customer has selected the shipping address, shipping method, and payment option. They now click confirm for the payment to finalize. We previously registered the following handler:
1
document.addEventListener('centra_checkout_payment_callback', this.paymentSelected);
Which is the one that will trigger now.
The following data is returned in this event:
| Field | Type | Comment |
|---|---|---|
responseEventRequired | boolean | Always false for Stripe. Set to true when the payment callback needs a response. Stripe does not use this. |
addressIncluded | boolean | When billingAddress and shippingAddress is included in the event. Always true for Stripe. |
paymentMethodSpecificFields | object | This data should be sent to the POST /payment call in Centra for the payment to be validated. |
paymentMethod | string | The selected payment method used. |
billingAddress | object | Data containing the address for billing. |
billingAddress.firstName | string | |
billingAddress.lastName | string | |
billingAddress.address1 | string | |
billingAddress.address2 | string | |
billingAddress.zipCode | string | |
billingAddress.state | string | Optional, might be empty for countries not supporting states. |
billingAddress.city | string | |
billingAddress.country | string | Country code |
billingAddress.phoneNumber | string | |
billingAddress.email | string | |
shippingAddress | object | Data containing the address for shipping. |
shippingAddress.firstName | string | |
shippingAddress.lastName | string | |
shippingAddress.address1 | string | |
shippingAddress.address2 | string | |
shippingAddress.zipCode | string | |
shippingAddress.state | string | Optional, might be empty for countries not supporting states. |
shippingAddress.city | string | |
shippingAddress.country | string | Country code |
shippingAddress.phoneNumber | string | |
shippingAddress.email | string |
We would take the event data, and create a checkoutRequest based on the data provided. This data would then be sent to the POST /payment in the Centra API.
1
2
3
4
5
6
7
8
9
10
11
12
13
paymentSelected = (event: any) => {
  const { checkoutRequest: checkout } = this.props;
  const { paymentMethodSpecificFields, paymentMethod } = event.detail;
  const { billingAddress: billingAddressData, shippingAddress: shippingAddressData } = event.detail;
  const billingAddress: IAddress = Address.create(billingAddressData);
  const shippingAddress: IAddress = Address.create(shippingAddressData);
  checkout({
    paymentMethodSpecificFields,
    paymentMethod: paymentMethod,
    billingAddress: billingAddress,
    shippingAddress: shippingAddress,
  });
}
This request would then result in the common PaymentActionResponse, explained in the Swagger UI and in Payment Method flows and does not differ for Stripe specifically.